Now that you have your Photodon screen protector or privacy filter, are you feeling intimidated by installing it? The instructions included in your installation kit explain and show just about everything you need, but sometimes it's still helpful to have a little extra explanation. So that you can gather the extra knowledge for a successful screen protector or privacy filter installation, please keep reading.
Installation Steps
You can definitely install your screen protector or privacy filter with success. All you need to do is read the instructions, take your time, and possibly have some help. Again, it is to your advantage to read the instructions first, have patience, and enlist help if possible.
These installation videos will be of help as well:
How to install a Photodon screen protector on a laptop – YouTube
Photodon Screen Protector installation on a 27" Monitor – YouTube
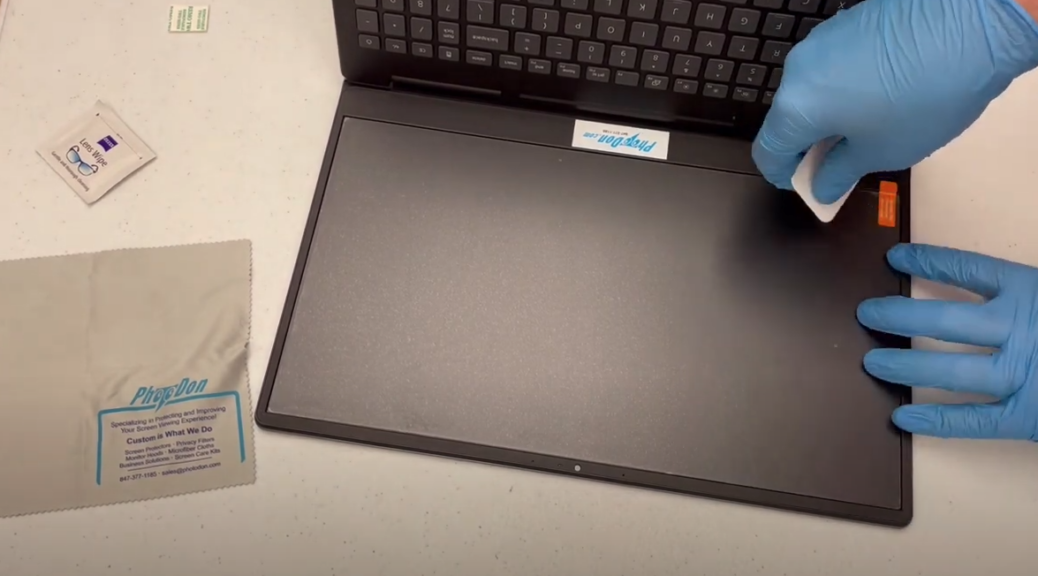
1. Clean your installation area
If you have a vacuum with a soft brush head, use that attachment to carefully remove dust from the device screen and surrounding area. Then, use either the included microfiber cloth and Anti-Scratch cleaning spray, or the Zeiss wipes from your installation kit to clean the device screen and surrounding area. This will reduce the amount of dust and debris available to find their way under the screen protector during installation. You can continue with this cleaning process at any point during the installation.
2. Try the test piece that came with your order
This sample piece's purpose is to ensure you approve of the material type and behavior before installing the actual screen protector. First, pull back the bottom liner about an inch and then place that exposed adhesive on your screen. Second, use either your finger or the squeegee to help apply pressure and allow the test screen protector to fully adhere onto your screen as you pull off the remainder of the back liner. You can use the squeegee to push out any remaining bubbles. Third, remove the front liner from the top of the test screen protector piece. Pull the orange sticker and use the squeegee if necessary to fully adhere the edges again.
Now you can try out the test screen protector. Get a feeling of what it looks and feels like on your screen. If you do not like it, do NOT unpackage your actual screen protector and contact us here at Photodon by emailing [email protected]. If you are pleased with the test piece, you can remove and discard it.
3. Verify the size of your screen protector will fit on your device screen
Now go ahead and take the screen protector out of its bag and hold it up to your screen. Ensure there's a slight gap between all four sides of the screen protector and the edges of your screen. That gap is supposed to be there so it is easier to install. If the screen protector does not fit, do NOT attempt to install it and contact us here at Photodon by emailing [email protected].
4. Clean your device screen and the screen protector
As before, use either the provided Anti-Scratch cleaning spray and microfiber cloth, or the Zeiss wipes, to remove dust and fingerprints from the device screen and your screen protector.
5. Begin with the bottom liner
Use the protruding clear tab to pull back the bottom liner about one to two inches. Line up that edge of the screen protector with the exposed adhesive to the edge of the device screen. Be sure the slight gap that you confirmed earlier is present so that the screen protector is properly centered on the screen.
6. Adhere the silicone backing to your device screen
Allow the edge of the exposed adhesive to touch and begin adhering to your device screen. If the screen protector does not make full contact on its own, you can push down on it to start the process. Now, while holding the screen protector in one hand, use the squeegee in your other hand to begin sealing the screen protector to your device screen. As you make progress, pull back more of the bottom liner to expose more of the silicone backing.
As you approach the end of the installation, look over the screen protector one last time to ensure there are no dust particles trapped underneath and that you are happy with the alignment. Remove the rest of the bottom liner to allow the screen protector to fully lay down on your device screen. To aid this, you can continue using the squeegee to adhere the screen protector into that last corner. Feel free to use that squeegee or your finger to seal down all the edges of the screen protector.
What to do if you see small bubbles during the installation process
If you notice small and completely clear bubbles during installation, do not worry about them and continue with the installation process. You can push out those small bubbles out to the nearest edge with the squeegee when you are done with the installation. See below if there is a speck in the bubble.
What to do if there is dust under the screen protector during the installation process
Small bubbles with a speck in the center indicate a dust particle under the screen protector that need to be removed. If you want, you can circle that dust speck with a marker right on that top liner in order to keep better track of it. You'll need to find the small white square of dust removal foam tape that came in your installation. Remove the liner on the tape to expose the adhesive. Next, pull back the screen protector past the speck and touch the dust removal foam tape to the dust particle. Note that dust normally sticks to the adhesive side of the screen protector.
At this point, it is a good idea to look for other specks before continuing with the installation. Gently wipe the screen with your microfiber cloth to remove any potential dust.
What to do if you see large bubbles during the installation process
If you notice big bubbles during installation, slowly lift up the screen protector far enough to remove the bubbles. Once the bubbles are gone, continue the process to continue applying the protector.
What to do if the screen protector is crooked during the installation process
In the event the screen protector's alignment is off, carefully remove it and start over.
7. Remove the top liner
Pull up and back on the orange sticker until the top liner is removed. Lastly, you might need to seal the edges of the screen protector again. If that is necessary, use the squeegee or your finger to do so.
Installation Kits
An installation kit is included with every screen protector or privacy filter order, and it contains everything you need for the installation process. Here is what is included with each of our kits:
Standard Installation Kit (MX2022)
Our standard installation kit is typically included with all screen protectors under 32 inches. You can also purchase one separately.
Contents:
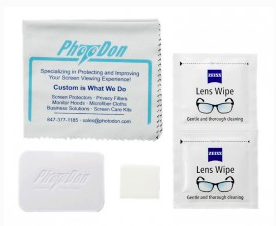
- Instructions
- (2) Zeiss wipes
- 6" x 7" silky microfiber cloth
- Small squeegee
- Dust removal foam tape
Deluxe Installation Kit (MX101)
Our deluxe installation kit is typically included with all screen protectors 32 inches and bigger. You can also purchase one separately.
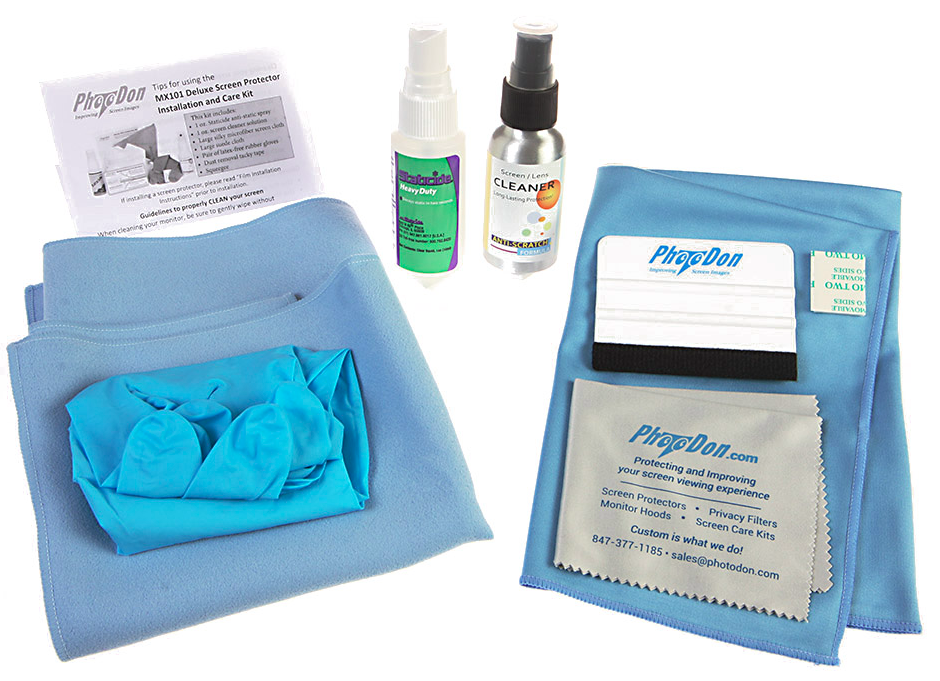
Contents:
- Instructions
- 1-ounce bottle of Anti-Scratch
- 1-ounce bottle of Staticide
- 6" x 7" silky microfiber cloth
- 14" x 14" microfiber cloth
- 12" x 16" suede microfiber cloth
- Squeegee
- Dust removal foam tape
- (2) pairs of latex-free rubber gloves
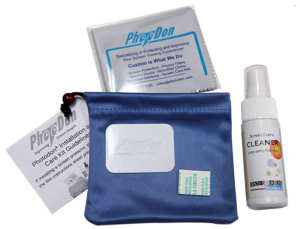
Mobile Installation Kit (MX102-M)
Our included mobile (in-dash) installation kit contains a microfiber pouch to keep in your glovebox or purse. You can also purchase one separately.
Contents:
- Instructions
- 1-ounce bottle of Anti-Scratch
- 6" x 7" silky microfiber cloth
- Squeegee
- Dust removal foam tape
- Microfiber travel pouch
Privacy Filter Installation Kit
Our privacy filter installation kit is complimentary with each non-adhesive style privacy filter order.
Contents:
- Non-adhesive privacy filter instructions
- Double-sided adhesive strips
- (2) Zeiss wipes
- 6" x 7" silky microfiber cloth
- 14" x 14" microfiber cloth
- (1) pair of latex-free rubber gloves
Extra Installation Tips
Hopefully this information has proven helpful for you. As a result, you should be able to successfully install your screen protector. Everything you should need is in your installation kit. To clarify again, read your instructions, take your time, and have someone help you if possible.
Photodon employees are always happy and ready to help with any questions you may have about your screen protector installation. If needed, don't hesitate to contact us at 847-377-1185, M-F 9:00 am – 5:00 pm EST, or email us at [email protected].